
Introduction
This page will lead you through the various stages of setting up and configuring the new Fortis/WooCommerce Shopping Cart Plugin.
- Compatibility and Features
- Plugin Installation
- Plugin Setup
- Transaction Processing and Settings
Compatibility and Features
Compatibility
|
WordPress Version Required |
6.0.0 |
|
WordPress Tested Up To |
6.5.0 |
|
WooCommerce Version Required |
7.0.0 |
|
WooCommerce Version Tested Up To |
8.7.0 |
Features
· Embedded secure payments iframe in the checkout page
· Supports WooCommere Blocks checkout
· Supports CC and ACH payment methods
· Level 2 and Level 3 processing supported for interchange optimization
· Webhooks for ACH status update on Settlement
· Logged-in customers can store CC and ACH details to use for future payments
· Refund and Void from the Order screen
· Sandbox mode for testing
· Customizable payments iframe appearance
Installation Instructions
1. Please navigate to the Fortis Plugin page of the WooCommerce Marketplace, where you can install the WooCommerce Plugin.
https://woocommerce.com/products/fortis-payments/
2. Open your WordPress Admin control panel.
3. Navigate to “Plugins”.
4. At the top of the "Plugins" page, you will see an option to "Add New". Click this option.

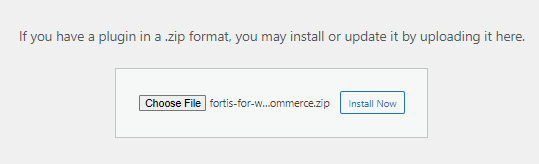
5. The next screen will have an option to "Upload Plugin". Click this option.

6. You will now see a new option to "Choose File". This will allow you to navigate to the ZIP File you downloaded in Step 1.
7. Once you have selected the plugin, select "Install Now".
8. Once completed, you will be redirected to another page to "Activate Plugin".
9. Click on "Activate Plugin" to enable the plugin on your store. This can take a few moments.

10. Once completed you will be redirected to the plugins list in your WordPress Control Panel.
Setup Information
- Once you have installed and activated the plugin, you will have an option called "Settings". Please click on this to configure your plugin to accept payments.

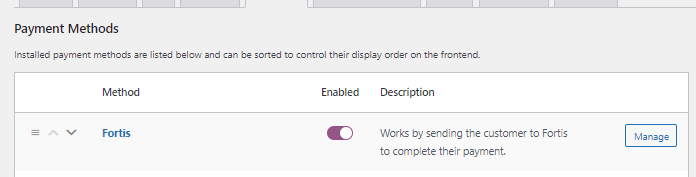
The plugin settings can also be accessed through WooCommerce Settings:
a. Click the "WooCommerce" option in the left side menu of the WordPress Admin site.
b. Select “Settings”.
c. Select the “Payments” tab.
d. You should see Fortis appear in the "Method" list.
e. Click “Manage”.
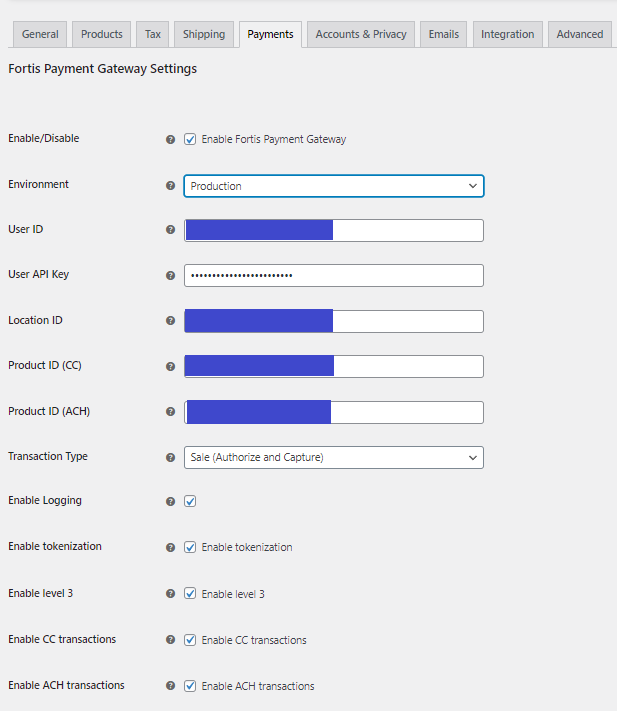
- You will need the following information to configure the plugin:
· User ID: Find a User ID
· API Key: Generate a User API Key
· Location ID: Find Your Location ID
· Credit Card Product ID (optional): Product Transaction ID
· ACH Product ID (optional): Product Transaction ID
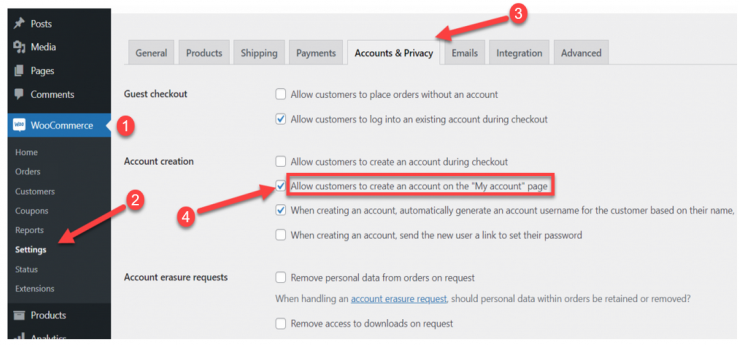
- In the above settings, if "Enable Tokenization" is selected, the Woo Commerce plugin will require users to create an account before checking out. This requires the account creation settings to be updated as shown below.
Developer (Test) Mode
The plugin supports both Production (Live) and Developer (Test) modes. In Developer mode, the plugin will connect to the Fortis sandbox environment, which models the responses and transaction statuses you can expect to receive in the live environment. This environment uses the transaction amounts and other transaction data to return predictable responses. To create a test account please sign up here.
Important Note
The credentials for your test account will be different from those of your live account. Please ensure that you use the correct credentials for the environment you have selected.
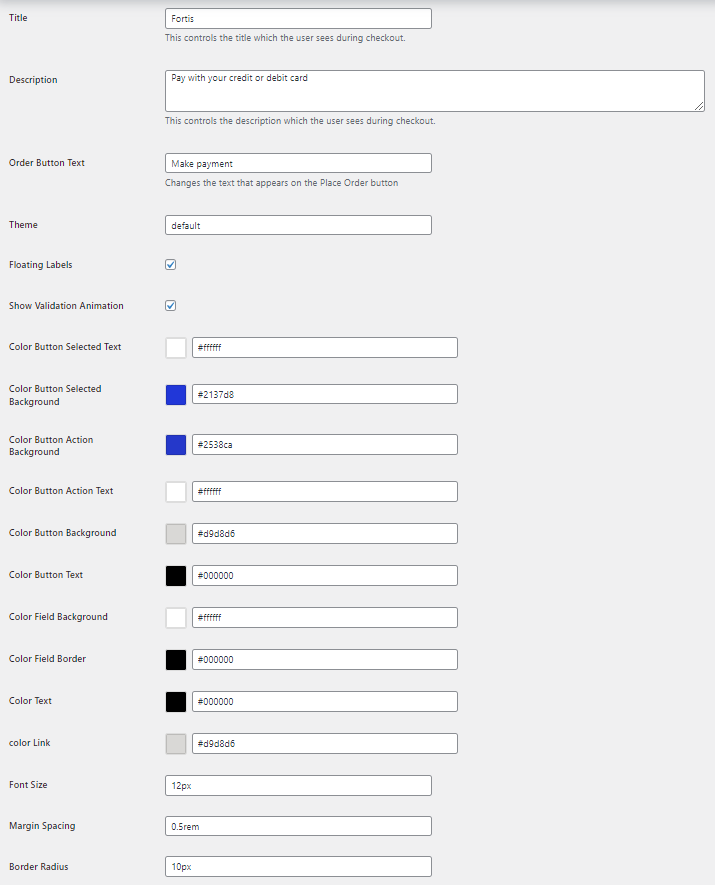
Appearance Settings
The WooCommerce plugin supports:
- captioning and styling of the payments iframe within the plugin configuration
- styling the color scheme used for the fields and buttons within the iframe by using the color picker or entering the RGB hex code
- customization of the font and spacing used for the iframe
Transaction Processing and Settings
This WooCommerce plugin supports both Guest and Account checkout options for customers wishing to make payments on your website.
- Guest Checkout
If you offer your customers the option to check out without creating an account, they can make a payment on the checkout page by
entering their credit card or bank account details (depending on which options you have enabled). However, the customer will not
be given theoption to save their details for making future payments. - Account Checkout
If a customer decides to create an account on your website they will be offered the ability to store their credit card or bank
account information when they make their first payment. The next time they make a purchase on your website they will be
able to select the payment method they added previously or enter new payment information. Stored payment details are
only displayed if the customer has logged into their account.
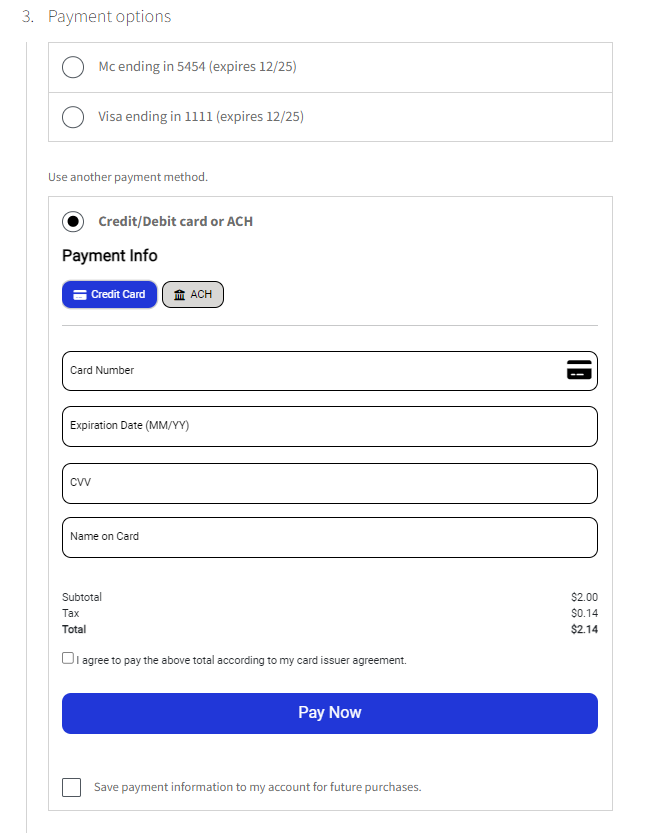
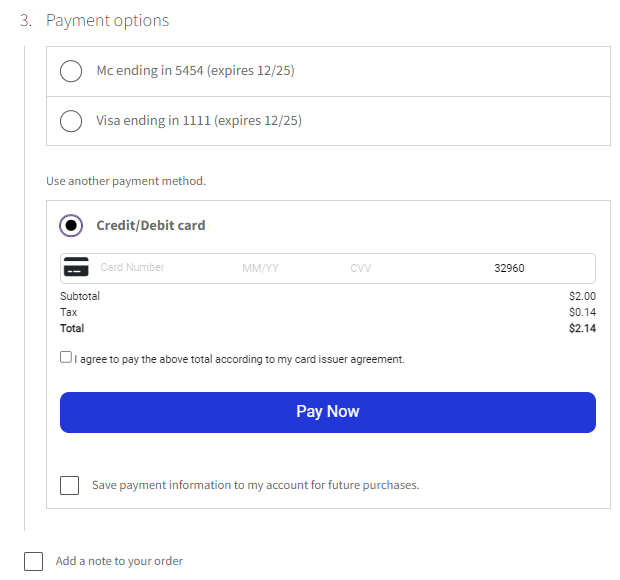
Payment Info Views
Your customers who have registered an account on your website will see one of the two payment iFrame layouts below after they log in. The payment options shown will vary based on the payment method(s) you have enabled in the WooCommerce plugin settings.
Credit Card and ACH Enabled
Credit Card Only Enabled
Types of Credit Card Transactions
Within the plugin, we allow you to select one of two transaction types. These are:
- Sale (Authorize and Capture)
- Authorize Only

Important Note
Authorize Only should be selected only if ACH is not enabled. ACH does not support the Authorize Only transaction type.
Depending on which option you select, when orders are taken on your WooCommerce store, the status of the transactions will look different.
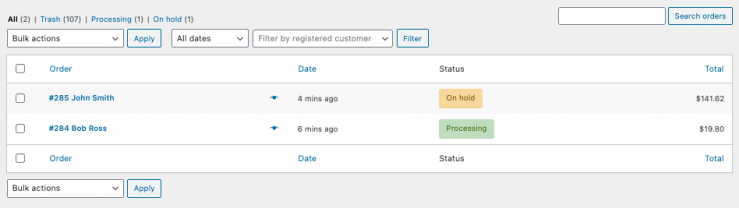
1. Sale (Authorization and Capture)
If you set your Transaction Type to Sale, your orders will take payment immediately and then appear with the "Processing" status. This means the funds have been authorized and the only thing left for you to do is to fulfill the order.
2. Authorize Only
If you have your Transaction Type set to Authorize Only, orders processed will only Authorize the funds to be taken. This indicates that the customer has sufficient funds available and the order will reflect the "On Hold" status. The transaction can then be captured manually in the Fortis merchant portal or another system integrated with Fortis.
Once the funds have been captured, the only thing left for you to do is update the order status.
4. Refunds
If a transaction has been returned and you need to issue a refund, that is also possible. We also support partial refunds in the event only part of an order is returned. To do this, you need to:
- locate the order
- go into the Order Details screen and
- select the "Refund" option.
Once you have entered the items to be refunded and are ready, you can refund the funds directly to the original card by clicking the "Refund via Fortis" button.
Important Note - If a full refund is done on the same day as the original order the transaction will be voided rather than refunded.